How Do I Update Docker Container/Image Version in QNAP Container Station?
I needed to update a service running in docker container (Pi-hole – Network-wide Ad Blocking) on my QNAP NAS. It is running as a container and not an “app” (docker compose in QNAP vernacular) and was originally created by GUI. Googling for how to do using the QNAP QTS Container Station GUI only worked for apps. I eventually have figured out a general way to do what I need, using command line docker on the QNAP.
Recreating a container?
It turns out there is no way in the QNAP Container Station web app GUI to “recreate” a container with the updated-to-latest-version image. Annoyingly, this works as desired in the “Apps” area of Container Station, but those are based on docker compose services and not the more simple single container.
Container Station loses track of which image is allocated to your container if you manually pull an image in Images interface– and then disables the “Re-create” item for the container. However, if you “re-create” the container, thinking it will pull the latest tagged image and use that for your “re-created” container, you’d be mistaken. It just re-uses the existing (older) image.
Using Virtual Networking in Container Station
It turns out that Container Station is syntactic sugar around a standard Linux docker install. It knows how to map filesystem shares, special networking, and subset of devices to services or containers. Understanding this is key to being able to update image version for existing container.
Needing a static IP on home LAN for pi-hole
I started using pi-hole on home LAN, and the simplest way to enable it on all network clients is by using pi-hole server as DNS server. How this works: pi-hole server IP is added as a manually specified DNS server on router. Then, when the router issues DHCP assignments, it includes pi-hole’s IP in list of DNS servers provided to clients.
For this to work, pi-hole server IP should be well-known, i.e., static DHCP reservation. And for that to work, the MAC address of pi-hole server needs to be set in router DHCP reservation table so that it assigns the static IP to pi-hole service/server.
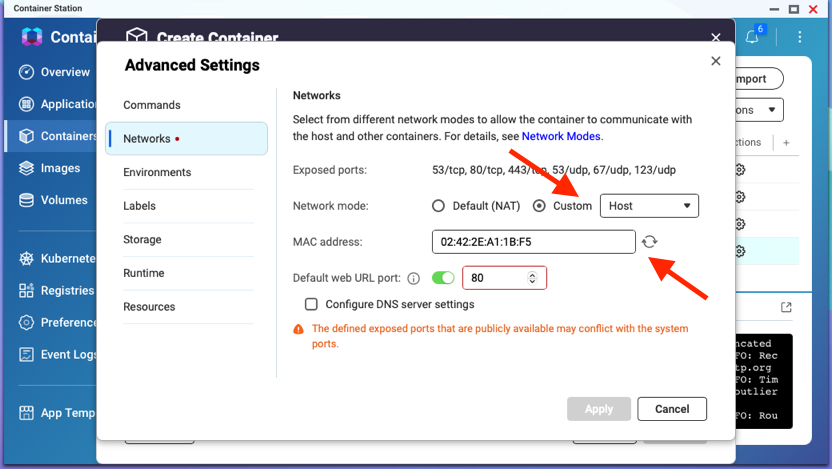
In our scenario, the pi-hole server is really only a docker container running at a virtualized network address managed by the NAS. It can be used to assign multiple unique IPs to docker container services, since it is a virtualized IP. and it uses a QNET interface – something specific to QNAP Constainer Station and docker implementation. I was not able to determine how to reliably configure the QNET interfaces, so I had container station do it for me!
It’s simply a process of using Container Station container UI to create the desired container, setting your required environment variables, and including host networking found in Advanced configuration, where a virtual interface with corresponding randomly-chosen MAC address can be allocated.

Using docker CLI and some utilities to update version
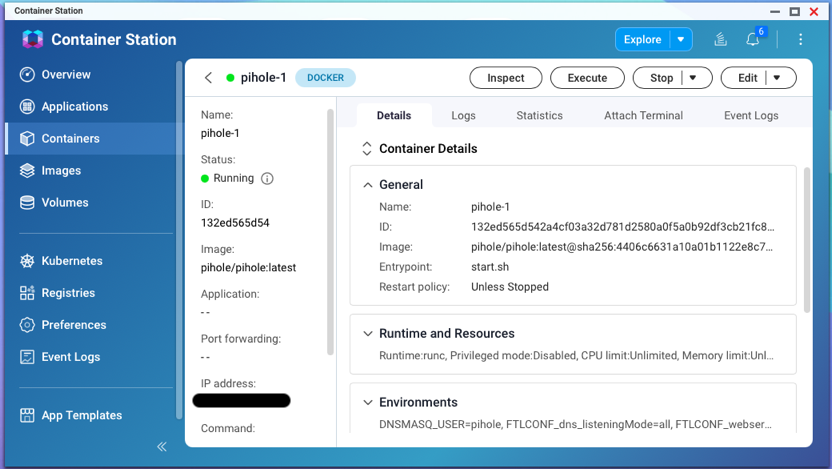
So now we have a container running using the QNAP-native QNET virtual network interface allocation. How do we update image version for container? We can use command line on QNAP server. So remote login to your NAS using ssh.
Figure out docker command line used to create image
There are couple useful utilities we’ll employ using docker itself to determine the command line we’ll use to re-start our container with the latest image.
To get YOUR-CONTAINER you can use
[~] # docker ps
CONTAINER ID   IMAGE                                COMMAND                  CREATED      STATUS                PORTS                    NAMES
132ed565d542   pihole/pihole:latest                 "start.sh"               8 days ago   Up 8 days (healthy)                            pihole-1
Above 132ed565d542 (CONTAINER ID) is YOUR-CONTAINER.
Part 1
Using runlike
Found via https://stackoverflow.com/a/32774347/47850
docker run --rm -v /var/run/docker.sock:/var/run/docker.sock:ro \
    assaflavie/runlike YOUR-CONTAINER
yeilds something like:
docker run --name=pihole-1 --hostname=3467123adbad --mac-address=02:03:04:05:06:07 \
 --volume /share/Software/Configs/pihole:/etc/pihole --env='FTLCONF_webserver_api_password=SUPER SECRET' \
 --env=FTLCONF_dns_listeningMode=all --env=TZ=America/Denver --privileged --network=qnet-dhcp-eth0-abcdef \
 --workdir=/ --restart=unless-stopped --log-opt max-file=10 --log-opt max-size=10m --runtime=runc --detach=true -t \
 pihole/pihole:latest
Notice this includes the --mac-address=02:03:04:05:06:07
Part 2
We are going to actually use most of the output from this Part 2 to form the command line. It uses clever docker templates to fill in readable command line.
https://gist.github.com/efrecon/8ce9c75d518b6eb863f667442d7bc679#file-run-tpl
Found via https://stackoverflow.com/a/38077377/47850
docker inspect --format "$(curl -s https://gist.githubusercontent.com/efrecon/8ce9c75d518b6eb863f667442d7bc679/raw/run.tpl)" \
 YOUR-CONTAINER
NOTE: Most of the information is the same, and some more information is included, but not everything is there.
Trim and Fill in any missing pieces in command line
The template version may be missing some important networking information, in this case the --mac-address we want to re-use. This avoids having to update the DHCP reservation settings when we re-create. If a different MAC address was chosen, that the DHCP server will allocate a random different IP address.
- tell docker to use specific MAC address
--mac-address=02:03:04:05:06:07 \
Also, instead of re-using --privileged, can be explicit with required capabilities (something the Container Station container GUI doesn’t allow for!). For example, add for NTP:
- capability to set time
--cap-add=CAP_SYS_TIME \
- expose NTP port
--expose "123/udp" \
Can also drop the numerous --labels since they will be pulled in from image when you run.
Summary
Full command line example (run on QNAP NAS server over ssh) using values extracted from the utilities above to re-create container uses latest image.
# stop existing container
docker stop pihole-1

# rename (since we are going to update/re-create with same name as before)
docker rename pihole-1 pihole-1-old

# start up again with curated command line
docker run \
  --name "/pihole-1" \
  --runtime "runc" \
  --volume "/share/Software/Configs/pihole:/etc/pihole" \
  --log-driver "json-file" \
  --log-opt max-file="10" \
  --log-opt max-size="10m" \
  --restart "unless-stopped" \
  --cap-add "CAP_SYS_TIME" \
--mac-address=02:03:04:05:06:07 \
  --network "qnet-dhcp-eth0-abcdef" \
  --hostname "3467123adbad" \
  --expose "123/udp" \
  --expose "443/tcp" \
  --expose "53/tcp" \
  --expose "53/udp" \
  --expose "80/tcp" \
  --env "FTLCONF_webserver_api_password=SUPER SECRET" \
  --env "FTLCONF_dns_listeningMode=all" \
  --env "DNSMASQ_USER=pihole" \
  --env "FTL_CMD=no-daemon" \
  --env "PATH=/usr/local/sbin:/usr/local/bin:/usr/sbin:/usr/bin:/sbin:/bin" \
  --env "TZ=America/Denver" \
  --detach \
  --tty \
  --interactive \
  --entrypoint "start.sh" \
  "pihole/pihole:latest"` \
When you execute the docker run command, it should pull the latest image as tagged "pihole/pihole:latest"
Once the image pulls and starts up, it should appear in Container Station (including logs and network interface mappings) as before. And the router DHCP assignment can use the same mapping for IP address, since it appears to have the same MAC address as previously.
