Siri Shortcut Controlled IR Remote for Home Receiver Using a Raspberry Pi
In my HomeKit™ household, one missing piece was turning on/off AV receiver, as the receiver only had an infrared remote control (no network connection). Since there was already a Raspberry Pi connected nearby (used for AirPlay® playback), a solution presented itself. Using some additional hardware I had available, there is even a way to control the receiver with Siri® shortcuts.
Table of Contents
- Get IR codes from Sony Receiver Remote
- Wire Up an IR Transmitter on Raspberry Pi
- Configure LIRCd With Transmitter Codes
- Invoke Receiver Controls with Siri Shortcuts
- Footnotes
Overview
- Determine control codes for IR remote in use
- Wire up and enable IR LED transmitter on a Raspberry Pi
- needs some wires and IR LED
- used a small single-transistor amplifier circuit to drive LED
- Configure LIRCd with transmitter codes and enable
- Create Siri® Shortcuts and add Siri® Phrases
Get IR codes from Sony Receiver Remote
My receiver came with a RM-AAU190 Sony remote1. The lirc-remotes project has not been updated in years (~2015 for most recent updates). That meant that the codes had to be read directly from the remote, since a config file was not already available.
Using Arduino and TSOP 38238 IR Receiver Diode
The hardware required to demodulate codes and decode the IR pulses are a microcontroller and an a “magical” IR receiver diode. In my case I had an Arduino and a quite common IR receiver IC that makes it trivial to read Infrared remote codes.

Sparkfun has a hookup guide that includes an IR receiver if you want to know more generically.
There is an excellent Arduino library that does all the work for you in decoding many varieties of remote codes: Arduino IRremote.
Once the IR receiver is wired up to the Arduino, and the IRrecvDump sketch is loaded (it’s an example sketch in the IRremote library), it’s a simple matter of:
- Pressing a button on IR remote control
- Looking at Arduino Serial Monitor to get the code corresponding to that button
- Transcribing the code into a LIRC daemon .conf file.
I have a repo with this receiver’s remote, RM-AAU190, along with other remote controls and their corresponding codes / config files.
. Here’s a snippet from the config file I created for my receiver’s remote (shared in same repo):
 begin remote

  name  RM-AAU190
  bits           15
  flags SPACE_ENC|CONST_LENGTH
  eps            30
  aeps          100


  header       2400   600
  one          1200   600
  zero          600   600
  gap          50000
  frequency    40244


  begin codes
    SLEEP       0x000000000000030C
    POWER       0x000000000000540C
    SAT/CATV    0x000000000000600D
    GAME        0x0000000000001F0C
Wire Up an IR Transmitter on Raspberry Pi
Now to drive IR remote code from Raspberry Pi, there is additional hardware and a kernel overlay.
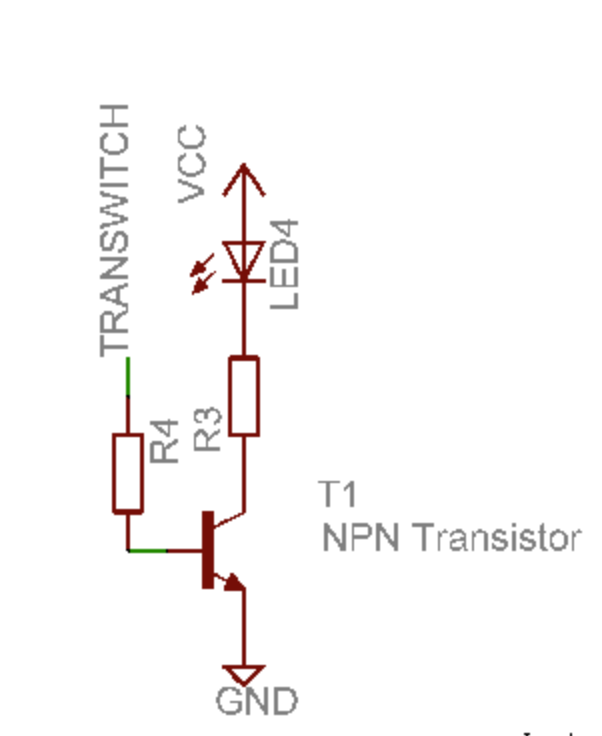
IR Transmitter circuit
The kernel driver from the Pi drives GPIO pins with the proper sequence of on/off pauses with the timings specified in the .conf file.
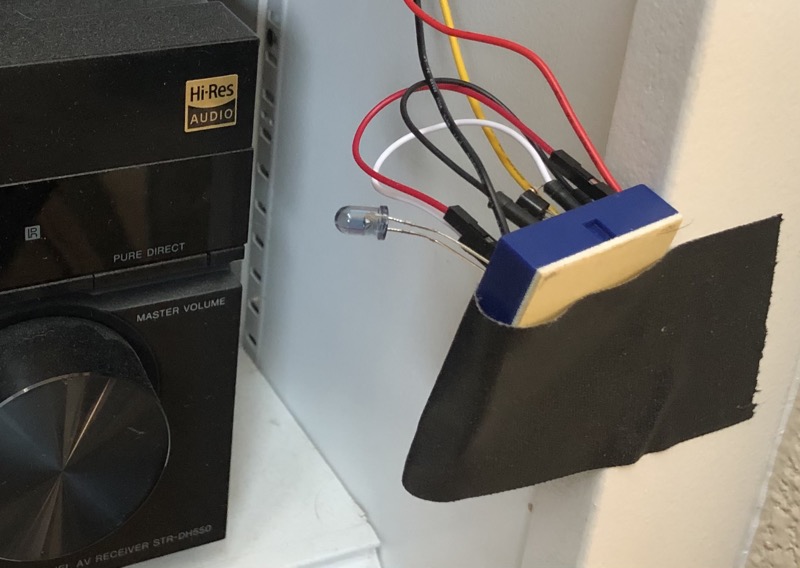
To supply a little more power than available from a GPIO pin, I used a transistor circuit to push more power through the IR LED. in the adjacent circuit schematic drawing, T1 is OnSemi 2N2222A NPN transistor, R3 is a wire (no resistor used) and R4 was a 10k resistor. You may wish to supply a non-zero current limiting resistor for R3.
LED4 is a 5mm 940 nm IR diode. The way it works for IR remotes is a code is sequenced through a series of on and off pulses through the LED.
The TRANSWITCH port is a signal coming from a Raspberry Pi header pin, which we get to next.
Raspberry Pi Kernel overlay for LIRCD
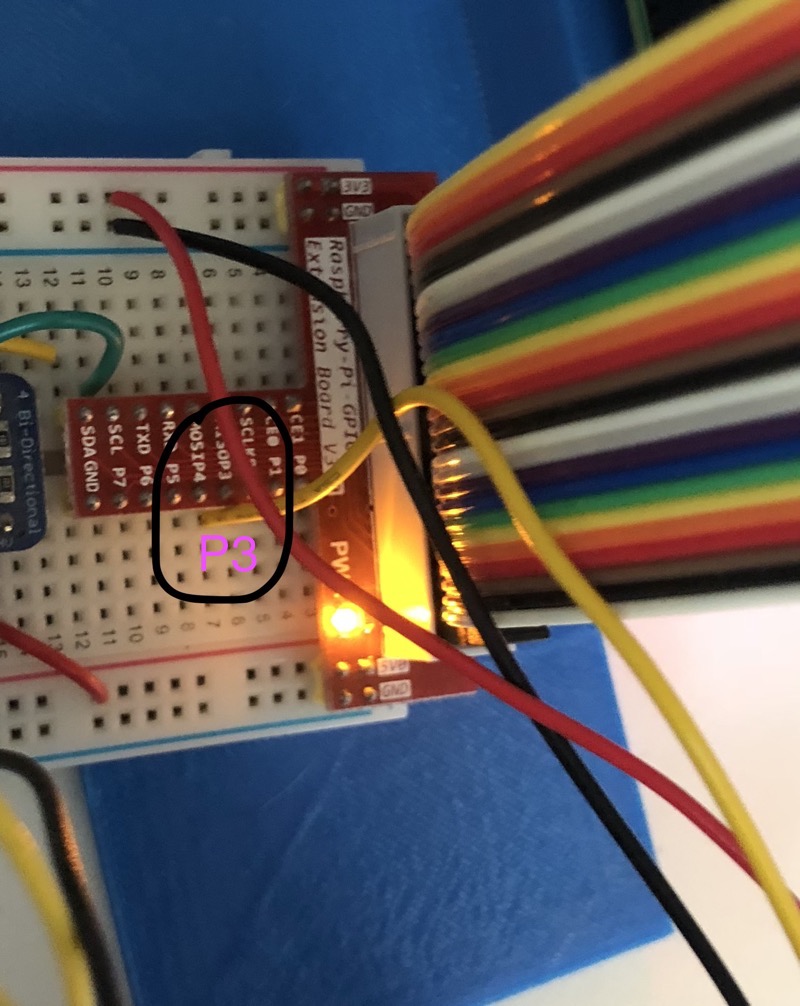
The output signal needs to be connected to the lirc-rpi kernel driver. For our purposes, we are going with, for output signal,
header pin15 aka GPIO 22 aka WiringPi Pin 3 (the Yellow wire in the above image is actually wired into P3, representing the WiringPi notation). There is a dtoverlay already available for us to do just that.
Edit /boot/config.txt
sudo vi /boot/config.txt
Add to config.txt:
dtoverlay=lirc-rpi,gpio_out_pin=22,gpio_in_pin=23
Need to reboot for the overlay to have an effect.
sudo reboot
Using dmesg can verify that the driver got loaded.
$ dmesg | grep -i lirc
[    5.308244] lirc_dev: IR Remote Control driver registered, major 243
[    5.323873] lirc_rpi: module is from the staging directory, the quality is unknown, you have been warned.
[    6.402237] lirc_rpi: auto-detected active high receiver on GPIO pin 23
[    6.402649] lirc_rpi lirc_rpi: lirc_dev: driver lirc_rpi registered at minor = 0
[    6.402658] lirc_rpi: driver registered!
[   11.245942] input: lircd-uinput as /devices/virtual/input/input0
[   11.438186] input: lircd as /devices/virtual/input/input1
Since we are only outputting (“transmitting”) our IR codes, we are not going to actually connect up an input. But LIRC can also act itself like an IR remote control receiver to decode remote button presses, so you could control functions into your Pi from a remote control. This setup does not do that.
Configure LIRCd With Transmitter Codes
There is a userspace utility that makes IR codes easy to send or receive on a Linux setup, such as a Raspberry Pi running Raspbian: LIRC
sudo apt-get install lirc
I have captured the full set of steps I used along with proper snippets for system config files in raspi-receiver-remote-control GitHub repo.
For example, there is an INSTALL.md in that repo. I also include additional details on the transmitter circuit and other electrical components in my implementation. The main README in that repo touches on that.
I created some python scripts that simplify or script IR commands. Here’s a taste of one of them
def power_on_switch_to_raspi():
    irsend(CODE_POWER)
    time.sleep(10)
    irsend(CODE_SOURCE_RASPI, count=2)
The python scripts are what Siri will invoke to perform its shortcut steps.
Here’s an example of running the script standalone.
~/projects/raspi-receiver-remote-control/bin/cold_poweron.py
2018-10-01 21:16:06.779936['/usr/bin/irsend', 'SEND_ONCE', 'RM-AAU190', 'POWER']
2018-10-01 21:16:16.831441['/usr/bin/irsend', '--count=2', 'SEND_ONCE', 'RM-AAU190', 'SA-CD/CD']
So we now have a working Raspberry Pi + python powered method to send IR remote control codes to our AV receiver.
Invoke Receiver Controls with Siri Shortcuts
I use AirPlay® (mostly via the excellent shairport-sync, which runs on Raspberry Pi’s) to play music throughout my house. Sometimes I am just too lazy to phsycially go to the receiver in my living to turn it on and switch to the input source that is connected to a Raspberry Pi running shairport-sync. Now, I can use Siri Shortcuts to do this for me using iOS™ 12.
Siri Shortcuts can do that?
The secret lies in the Run Script Over SSH step that is available in the Shortcuts app.
Since there was a git clone of my raspi-receiver-remote-control repository on the Raspberry Pi, any python scripts that are there can be run remotely via an SSH command. And Siri shortcuts can run an SSH command.
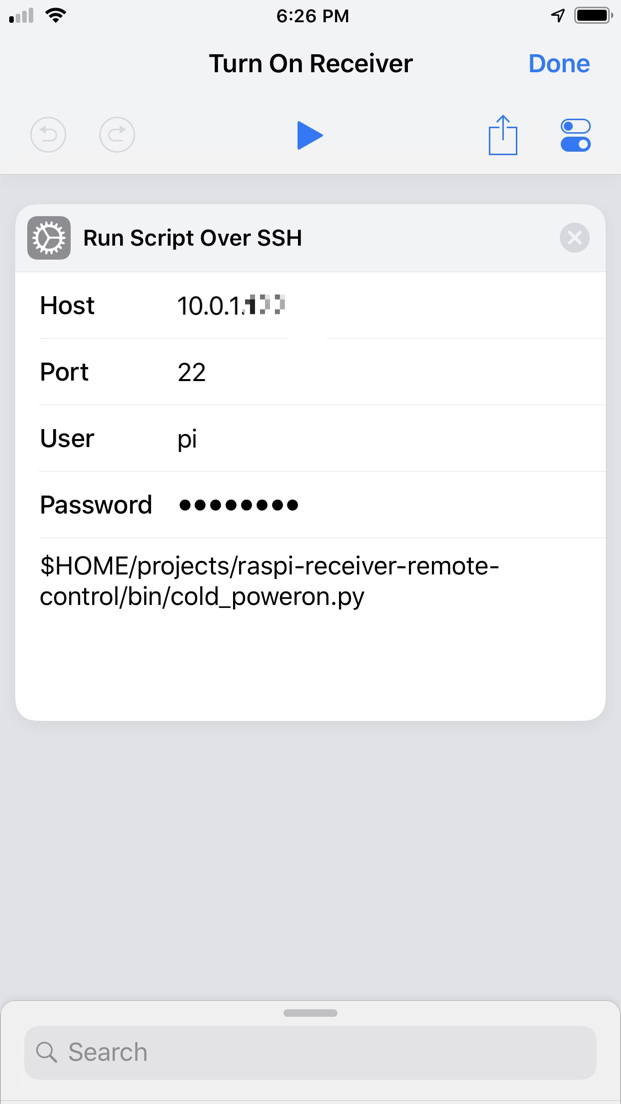
In the shortcut is the full path to the cold_poweron.py script that turns on the stereo receiver and switches the source input to the Raspberry Pi.
$HOME/projects/raspi-receiver-remote-control/bin/cold_poweron.py
I associated the Siri® Phrase “Turn On Receiver” for the Shortcut (along with a corresponding “Turn Off Receiver” Shortcut) and now I can tell Siri® on my iPhone® to carry out my commands.
Something to note is that, at least on iOS™ 12.0, you need to add a Siri Phrase on each device. So if you have an iPad you want to use, you need to re-record the Siri Phrase. Another thing to note: on macOS™ Mojave, there are no Siri® Shortcuts implemented (yet?!).
The Siri shortcut even worked for me when invoked via an Apple Watch® from watchOS® 5.